I had the pleasure of shooting with Amy Wilder again! It is always such a joy to shoot with someone who is so on top of their shit. This girl knows how to work it. Normally when I do a shoot I'm trying to get as much "right" in one frame as possible. Aka the face, pose, hair, dress, whatever other magical elements that I'm capturing in camera, all to my liking in one shot. Very often I can get pretty close and only end up adding a bit of extra dress here or a hair flip there. Although apparently there are those other times when your model gives you too many perfect pictures and you just cannot decide what to use ... so you go nuts and just combine many shots ... so. many.

While we where shooting Amy tried all kinds of different things - variations of the pose, facial expressions, dress-blowing-fan placement, lighting alterations, sword hand swaps and so on. I built up quite the library of bits and bobs to work with. Let's be real though, I could have chosen just about any of the images and used them for my final piece just as they were and it would have been awesome; she really nailed it in every freakin shot. However, I ended up having my cake and eating it too ... or something like that. Rather than spending any more time trying to figure out which stellar image to take the time to edit, I decided that I would just compile all of my favorite pieces. It was a lot of pieces.
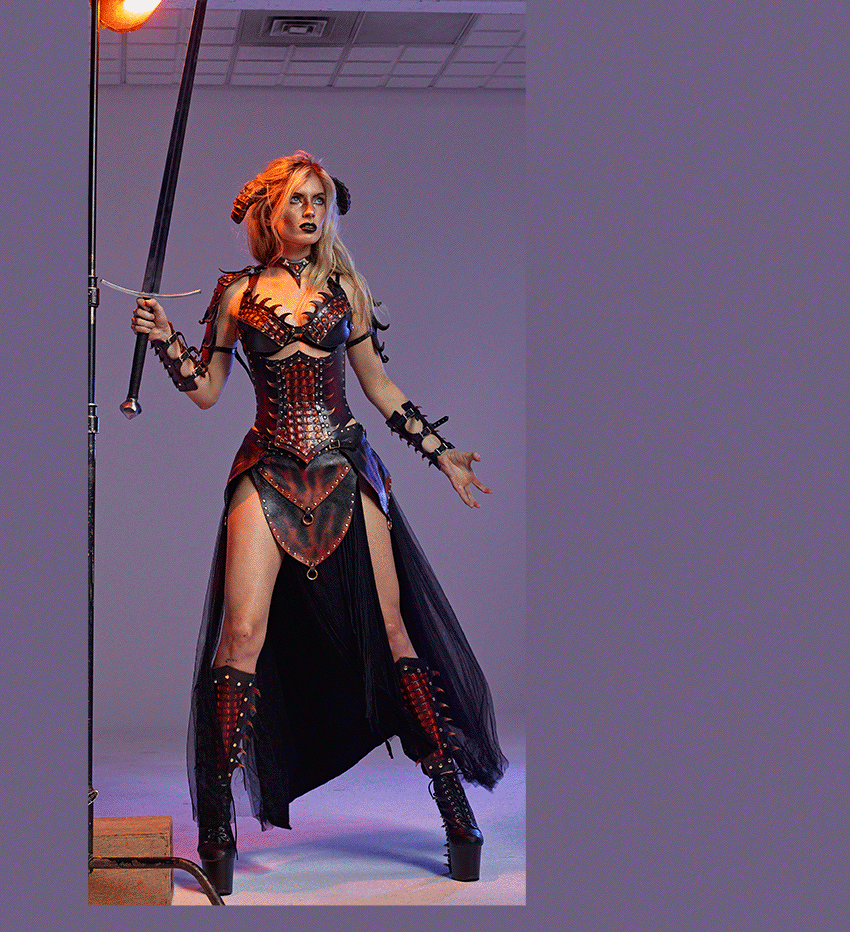
There are many variables that you just can't perfectly control in an image, like how fabric is going to flow, what the hair might do when tossed and so on. So it's pretty common for photographers/digital artists like myself to end up using hair/fabric/whatever from other pictures to add a bit of zazz to the photo, but it's not every day that you end up using a different head, hair, torso, arm, other arm, leg ... other leg, etc. It was quite an undertaking to just decide which pieces were the best ... "Frankenstein-ing" them together was a whole different monster ..... Frankenstein's monster! Sort of.

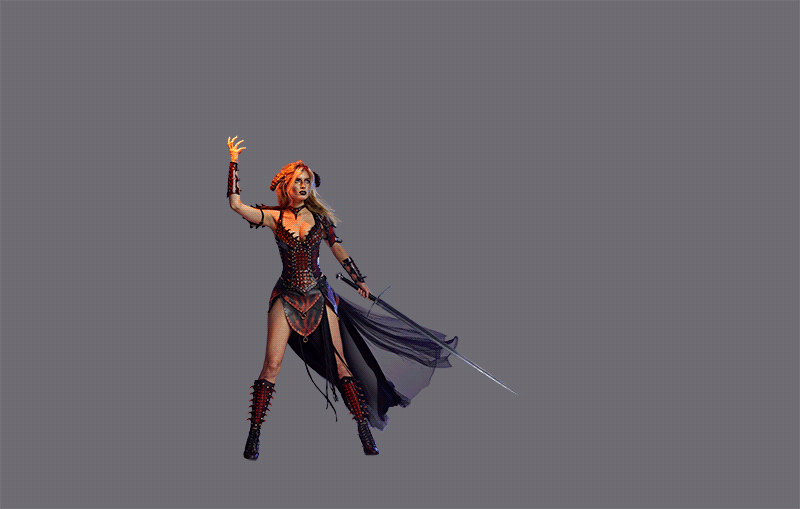
It was super tough to get all the pieces to blend together seamlessly. There were a few points throughout the edit when she looked too stiff or fake in a weird "these are not my actual arms" sort of way. I ended up using "Warp Transform" and "Liquify" quite a bit to push and pull the different parts into the right orientation. There was also a heck of a lot of masking bits away and bringing back tiny parts of the edges of things until I was satisfied. Note that if you use the warp tansform tool it does blur your detail slightly (pesky little bugger), so this is best not to be used on the head/face. But for arms/legs it's often quite called for and nothing that a little sharpening can't fix. ;)
Now, can we just take a minute (or five) to talk about the epic fireball? CAN WE!? Ok great. Despite the fact that I was all over the place as far as which picture ... erm pictures to edit, believe it or not I actually did have a plan for this shoot. (Didn't see that one coming, did you?) I knew she was going to be approaching some unseen foe, and conjuring up a lovely ball of magical fire to donate to said unseen evil beastie. I had a flash set up above her hand with a few layers of orange and red colored gels on it to emulate the right sort of light. I could have added all the warm fire light in post (like I did here), but since I knew what I was going for from the get-go I was able to light accordingly, which majorly helped in the end.
I got my hands on ParticleShop, a program crafted by the creative minds over at Corel Painter. It's essentially a magical brush plug in. With the swipe of a mouse/tablet pen you can create incredibly complex, perfectly flowing, and natural looking elements. One method for using ParticleShop is to bring your image into the plugin and paint on top of it where you'd like to add things, then it lets you save just your new brush strokes on their own layer when you hop back over to Photoshop (without the image you're painting on merged with them). I tried this a few times, but found that to get exactly what I wanted it was easier for me to just use a plain black layer, paint up a handful of "pieces" with ParticleShop, then twist, warp, and place those elements to my liking back in Photoshop. Below are a few of the fire swirls I created in ParticleShop.
It was really fun to just let my hand flow around and create different swirling fire-y vortexes in ParticleShop, and then spruce them up some more in Photoshop with a couple of overlay layers and some sparks from The RAWexchange Store. While we are on the subject of the Raw Exchange Store ... which seems to happen a lot these days, but like they say, "when you love something set it free ... or use it and talk about it all the freakin time because YOU LOVE IT!" (They say that, trust me I've heard them.) Anyway, I also tapped into a HUGE package they have over on RAWexchange that is full of crazy 3D renderings of all kinds of awesome things! Everything from spaceship hangers to post-apocalyptic city streets can be found in this hefty bundle. I ended up using a handful of these weird yelling-old-man-face-rock-formations to create most of my background. Having pre-rendered/already masked pieces to just plop into my scene and shove around was pretty dang fantastic. Oh and of course this image wouldn't have been complete without some smoke/fog.
Well folks, there you have it. I pieced together exactly the image I was hoping to create while taking advantage of the talents of all kinds of different people. Thanks to Amy for just being all around fabulous, to Thomas Willeford for making incredibly kickass armor, to the people over at ParticleShop for letting me play with their fun toys, to the guys running the show at the RAWexchange Store for always having everything I could have ever needed, and of course to Photoshop for making the program that allows me to be a modern day Dr. Frankenstein!
